


Raspberry Pi 5 with NVMe Base Duo
About NVMe Base Duo
NVMe Base Duo lets you connect up two large NVMe solid state drives (SSD) to the PCIe (that’s ‘Peripheral Component Interconnect Express’) connector on Raspberry Pi 5 for well over 256GB. Im going to connect just 1 500gb of storage for testing.
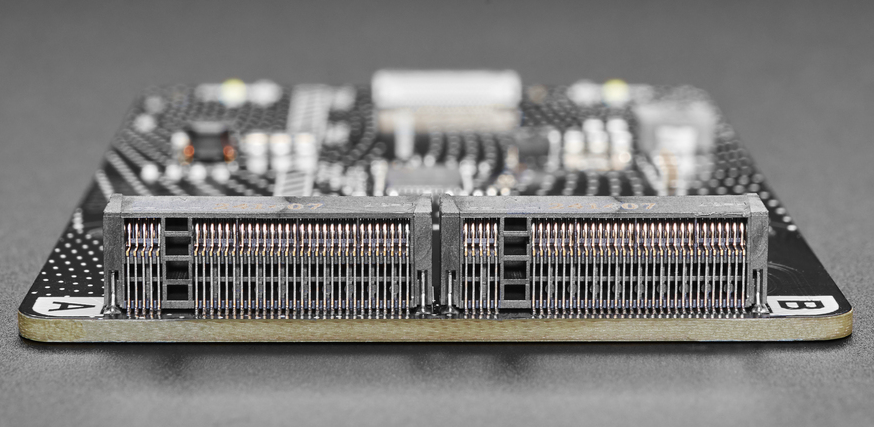
This Due board has 2 ports so i can use raid 1 and mirror the SDD so i have redundancy and help keep my storage safe. more on that later’
What im using in this Project
- Raspberry Pi 5
- multi port anker power supply(Anker 26800) or a samsung 45w usb c brick

- A microSD card
- A NVMe Base Duo
- SSD im using a 500GB
- Samsung 980 500GB M.2 2280.
- Samsung PM981 512GB SSD NVMe 2280 (second SSD)
Patriot Memory P300 M.2 Pcie Gen 3 x4 512GB(Dead on arrival)
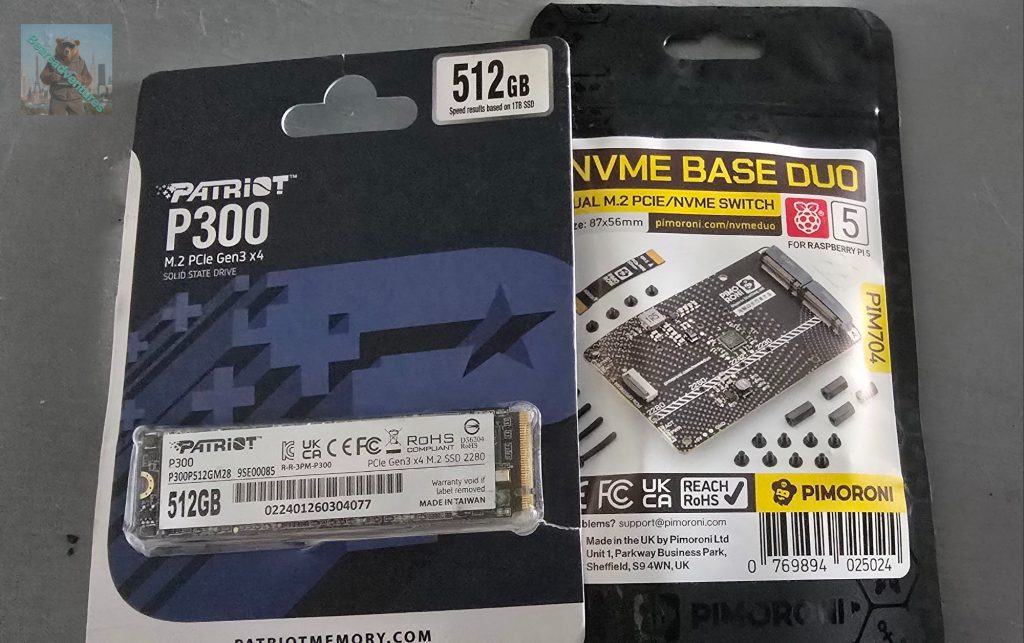
The SSD needs to be NVMe M.2. Don’t get this confused with SATA M.2 drives which sometimes look similar but are not compatible. NVMe and SATA refer to the interface communications standards, and M.2 to the form factor.
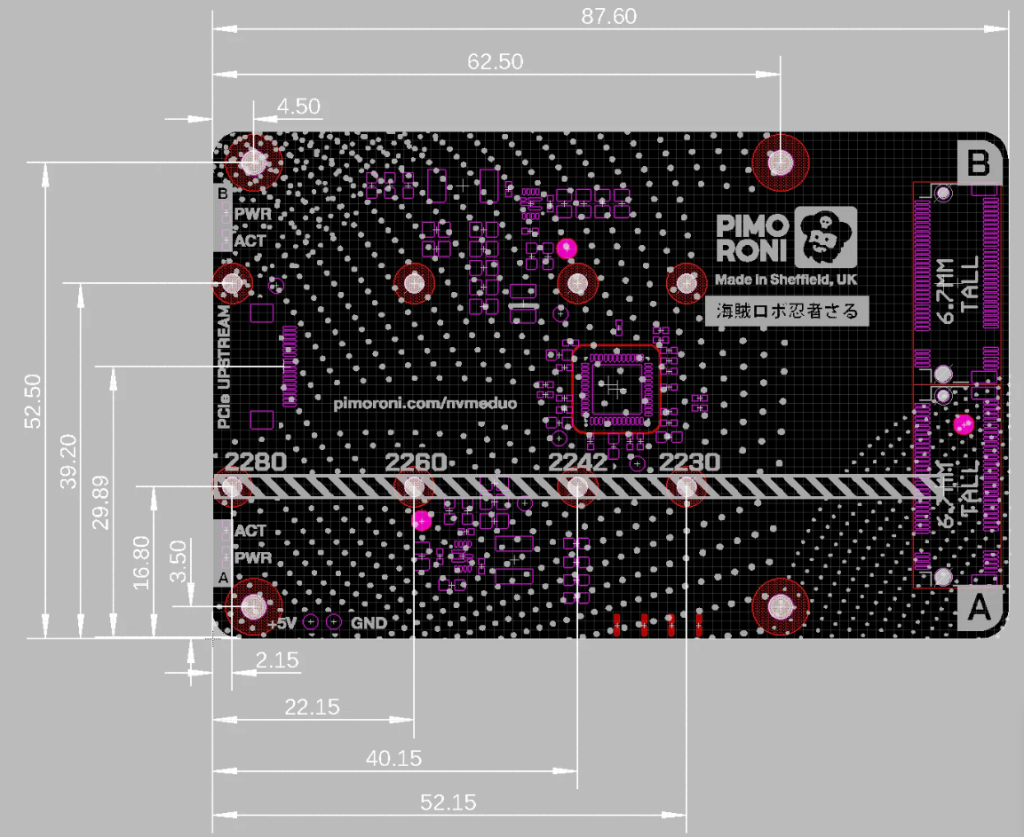
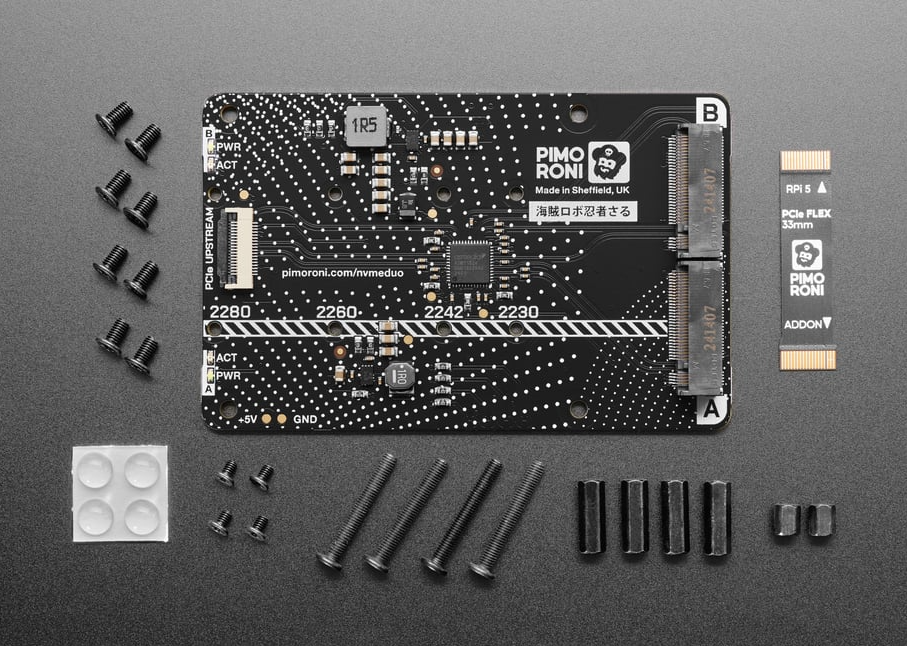
- Duo can take SSDs of physical sizes between 2230 and 2280 (the numbers refer to the size of the board – i.e. 22mm wide by 30mm to 80mm long).
⚠ NOTE: You can now boot from these SSDs we will go into that later
Putting it together
The NVMe Base Duo kit contains the following:

- A NVMe Base Duo PCB.
- A flexible ribbon cable with writing on one side. (33MM)
- Four stick on rubber feet.
- A standoff set.
The ribbon cable
Now gently push the ADDON end of the ribbon cable into the socket, ensuring the side with the writing is pointing downwards. You should see the cable go underneath the line of silver prongs. if you notice mine is damaged, I did not think much of it at the time of assembly, At this stage i have ordered a new ribbon and a longer 49mm.
If you’re missing anything, drop support a line (please do double check the bag before you do though, the ribbon cables in particular like to hide in the corners).

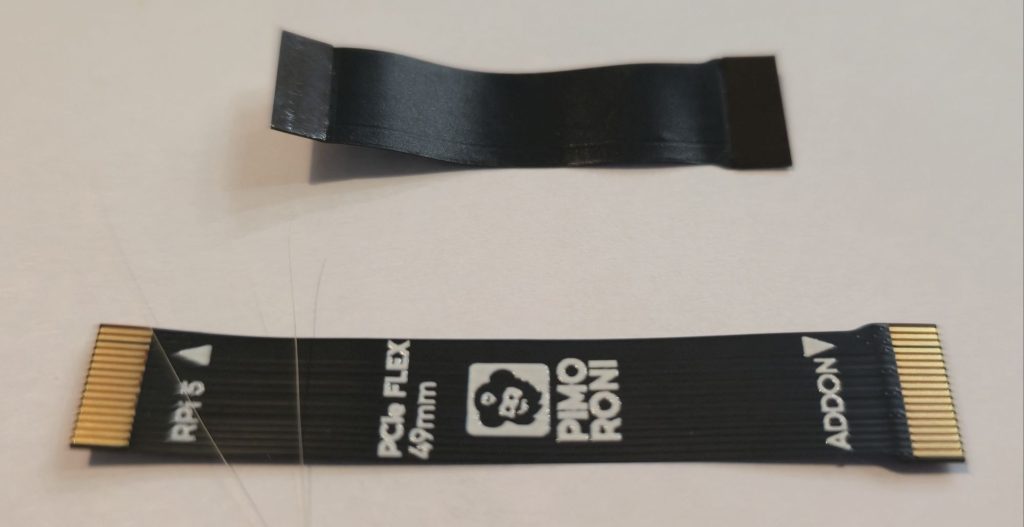
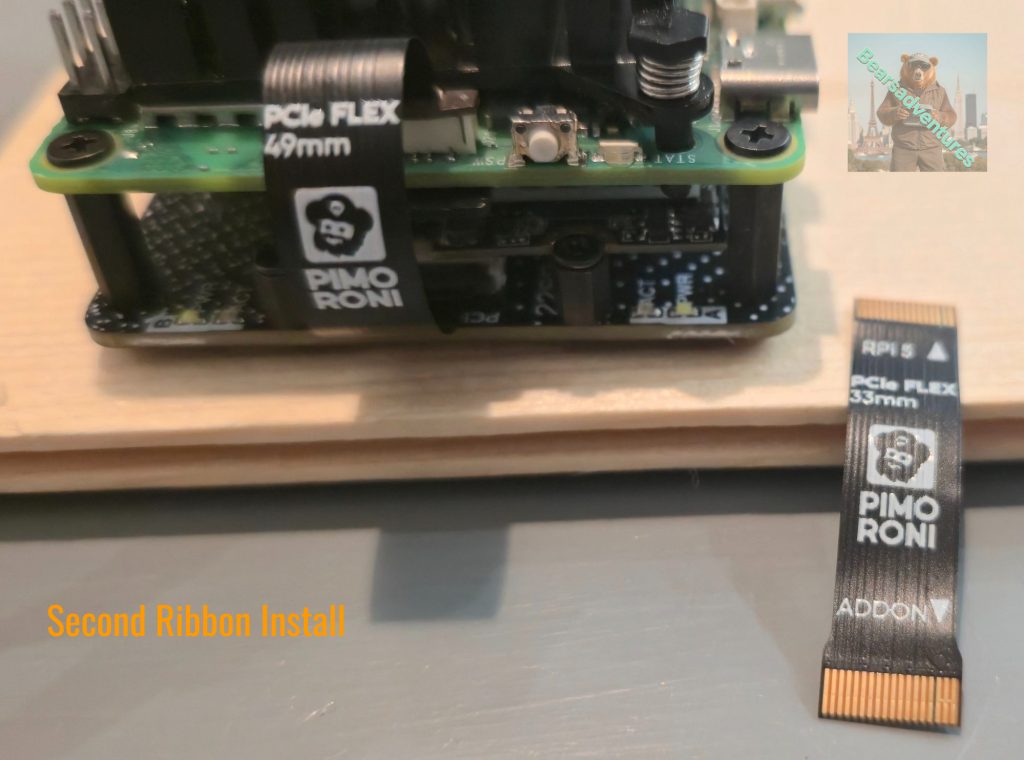
One end of the cable is wider and is labelled ADDON – this is the end which goes into the connector on the base. The other end (labelled RPI 5) goes into the Raspberry Pi 5’s PCIe connector. I purchased a longer cable. top is 33mm and bottom is 49mm
Attaching the SSDs
Next we’ll attach the small standoffs that hold the drives in place. Take one of the tiny M2 screws and post it through one of the small holes running down the middle of the board, from the bottom. Use the hole which corresponds to the length of your SSD (2280 if you’re using one of our SSDs). Secure it in place with one of the short standoffs.
Repeat this process for the second small standoff.

There is a round semi circular cutout in the middle of the other end. This will sit on top of the short standoff and is where you will secure the SSD to the base.
Now carefully push the SSD into the socket. It will only go in one direction, and doesn’t need much effort.

Take your time and ensure the SDD is in place and firm. do not over tighten the screw holding the SSD is place as you may damage the drive.
Attaching the standoffs to the Duo
Inside the standoff set, you will find:
- Four long M2.5 hex standoffs, for attaching the base to your Pi
- Eight short M2.5 screws
- Four long M2.5 screws
- Two short M2 hex standoffs for mounting the drives
- Four teeny tiny M2 screws
(You may also have a few spares!)
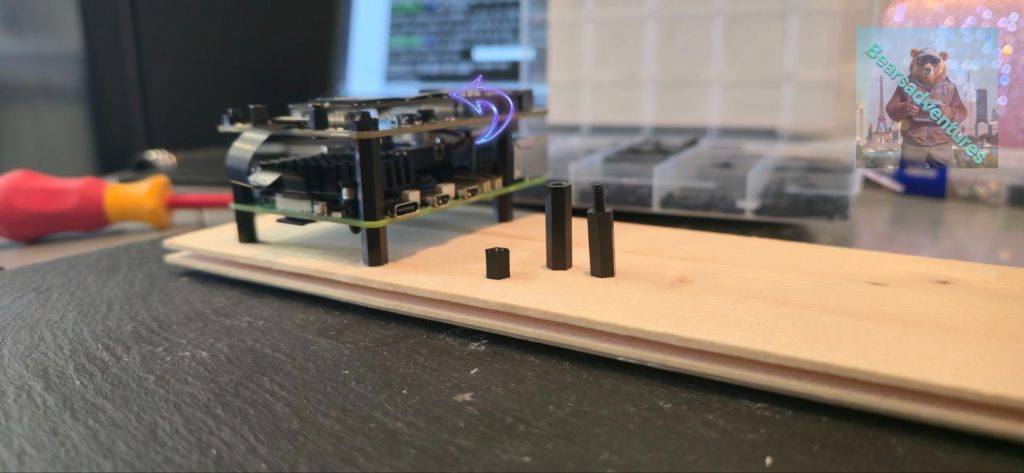
So not to damage the project i have opted for this peace of wood for easy moving. There is 4 stand offs on the MVME board you need to add so you can then mount the pi5 over the top of it.
Side note. when you do mount the pi board makesure you have your OS install and SD card inserted .

You can now clearly see the SSD im going to use for this stage of the project
Patriot Memory P300 M.2 Pcie Gen 3 x4 512GB low-power consumption SSD,P300P512GM
The Patriot Memory P300 M.2 PCIe Gen 3 x4 512GB SSD is a high-performance internal solid-state drive designed for desktop computers. With its low-power consumption and black form factor, this SSD offers fast read speeds of up to 1700 Megabytes per Second and write speeds of 100 Megabits per Second. The compact M.2 dimensions of 0.38 x 8 x 2.2 cm make it ideal for use in modern desktop systems, providing ample storage capacity at 512GB. The Patriot Memory brand ensures reliability and quality in this essential component of any computer system.

Attaching the ribbon cable to the Raspberry Pi 5
⚠ Ensure your Raspberry Pi 5 is not powered on!⚠
The Ribbon i used here is the longer ribbon 49mm. because the ribbon that came with the board seemed damaged. I found it easier this time around to mount the ribbon on the PI 5 PCIe first before inserting it into the NVME board. I did try the ribbon that came with the board but i thought because it was damaged is to why i was having problems with the NVME board.
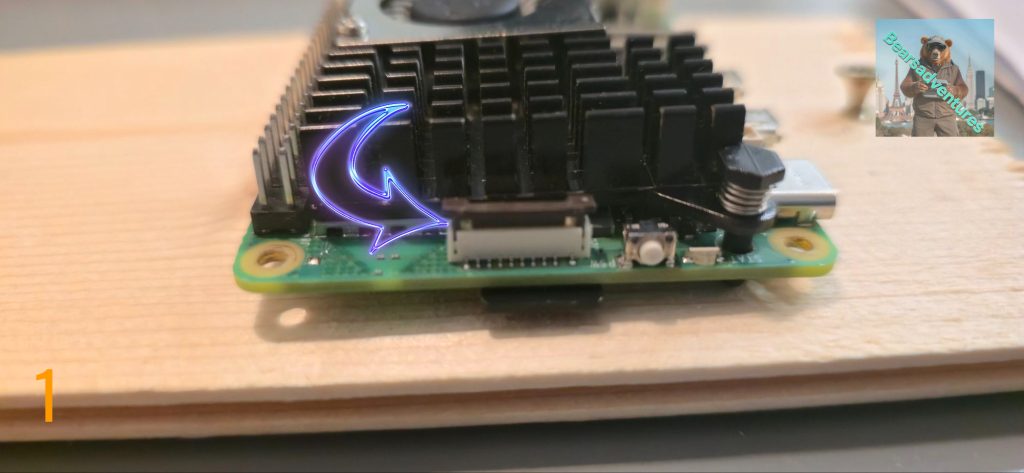
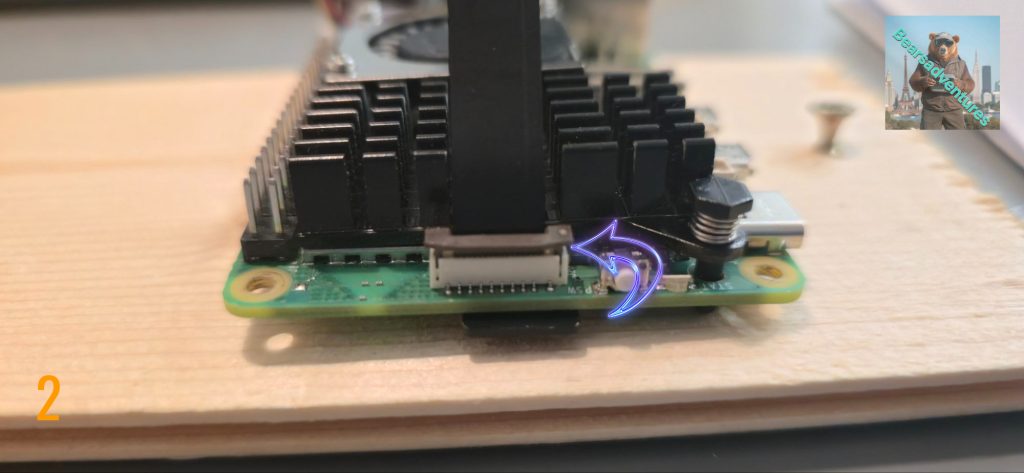
Locate the Raspberry Pi 5 PCIe connector – it is located next to the Pi’s on/off switch (See picture 1). It has a brown clip which slides up and down, at right angles to the Raspberry Pi board.
I have Slotted the ribbon into the PCIE Connector(See picture 2). Brown clip is still up and not secured against the ribbon.
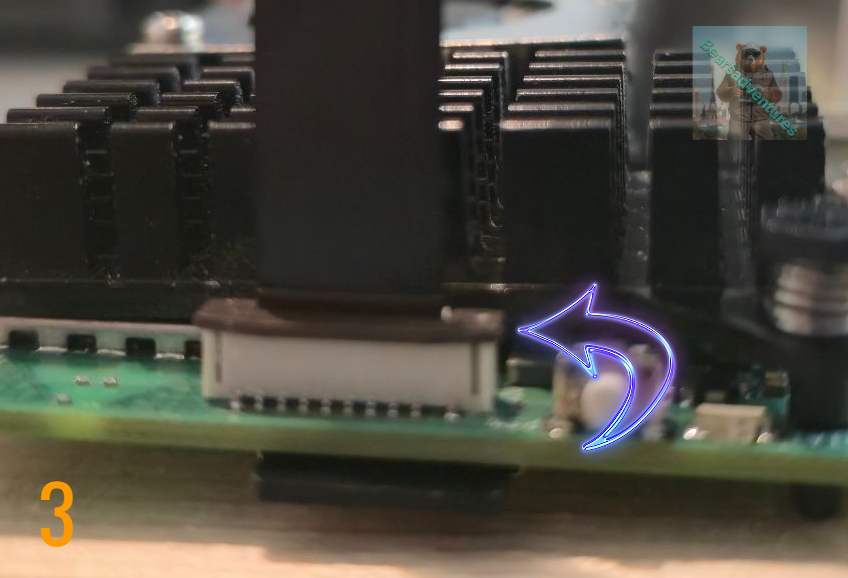
The Brown clip is now secure(See picture 3) and the ribbon in place, Ensure the ribbon is pushed in while securing the brown clip.
Side note : Carefully lift the clip up by about 1mm like in Picture one not to pull the clip off (See picture 1).
Attaching the ribbon cable to the base
The ribbon cable connectors have small plastic clips which you have to ‘open’ to put the ribbon in, and close again to secure it in place. These clips require very little pressure to move and are quite fragile, so it’s worth being careful with them.
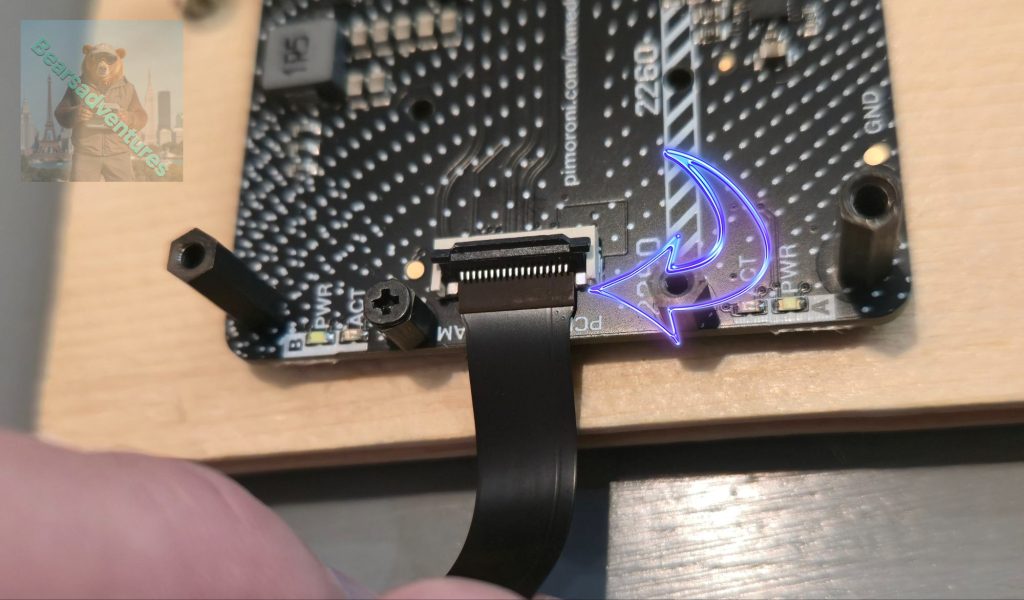
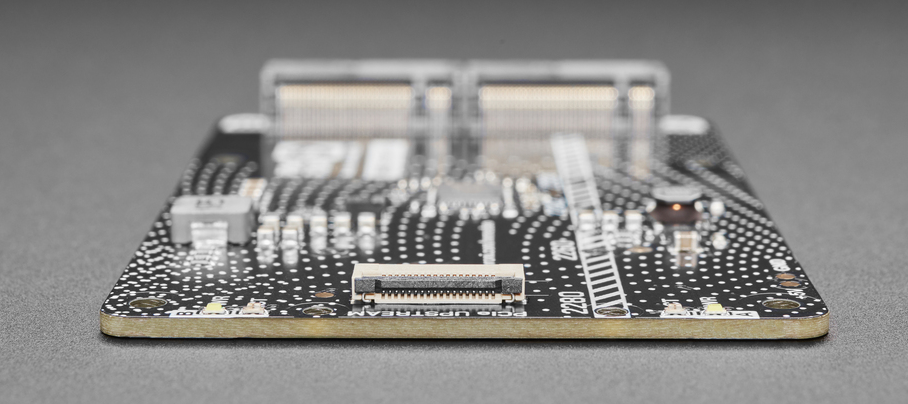
Using tweezers, flip the grey clip of the one of the sockets on the base upwards. It will swivel into an upright position. The Socket should look like the below picture

Securing the Ribbon to the NVME board
Gently Slide the Ribbon into the Connector. as you slide the ribbon in you will feel, See the ribbon move into place and there is risers on each side so to ribbon is in the correct location.
⚠ Note that the clips on the base and the Raspberry Pi work slightly differently from each other!
Final Assembly
⚠ Now is a good time to plug in the SD card to your Pi, before the ribbon cable gets in the way of the slot. If you don’t already have a microSD card with Raspberry Pi
so now you should have something that looks like the below picture. The picture was my first attempt at putting this together using the 33MM ribbon. the SD Card is nearly inaccessible due to the ribbon.
I use the longer standoffs. everything is where i want it. When i plugged the pi in power to both boards looks good, lights up like a chiasmas tree. Access to the OS / SSH was no issue. so i went to updating everything. instructions on how to below(Updating everything). No Joy. After the updates and reboot. there is no PCIE Detected or the NVME SSD is not detected. So what now.

I ordered the New Ribbon(49MM) so to have more space to remove the SD card and to see if the first ribbon was damaged so i went through the same process(Updating everything) But i get the same. As you can see below abit more room to remove the SD card but i would not advise to try.
Updating everything
I put this Part together of all the code and findings of trying to get this NVME duo board working with the PI 5 Board.
So now lets jump into a shell and login to our PI 5.
Once logged in update and upgrade.
sudo apt update
sudo apt upgrade
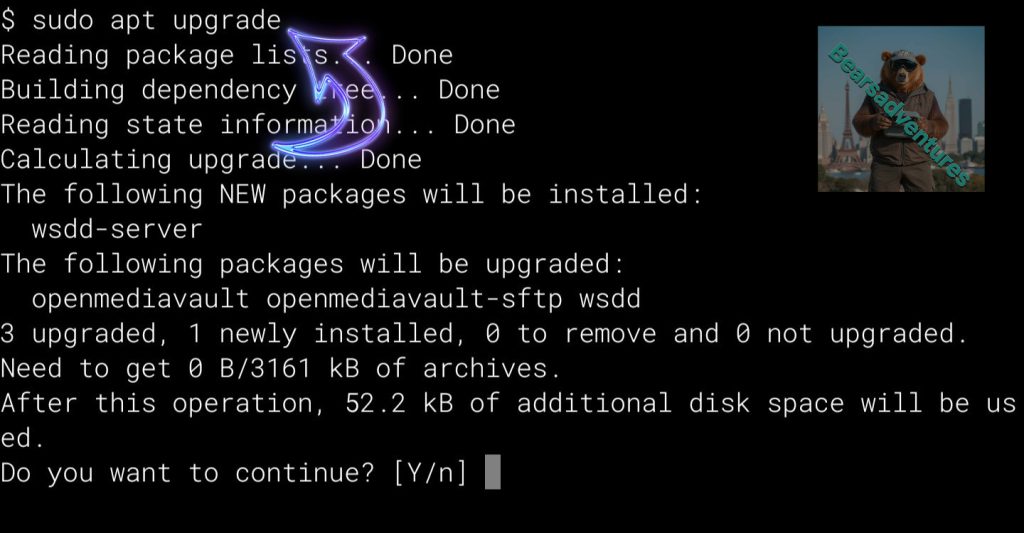
Once you’ve finished updating and upgrading, you should then reboot your Pi 5:
sudo reboot
Checking NVME base installation
To check that the ribbon cable has been connected correctly and the SSD installed properly, open a Terminal window and type:
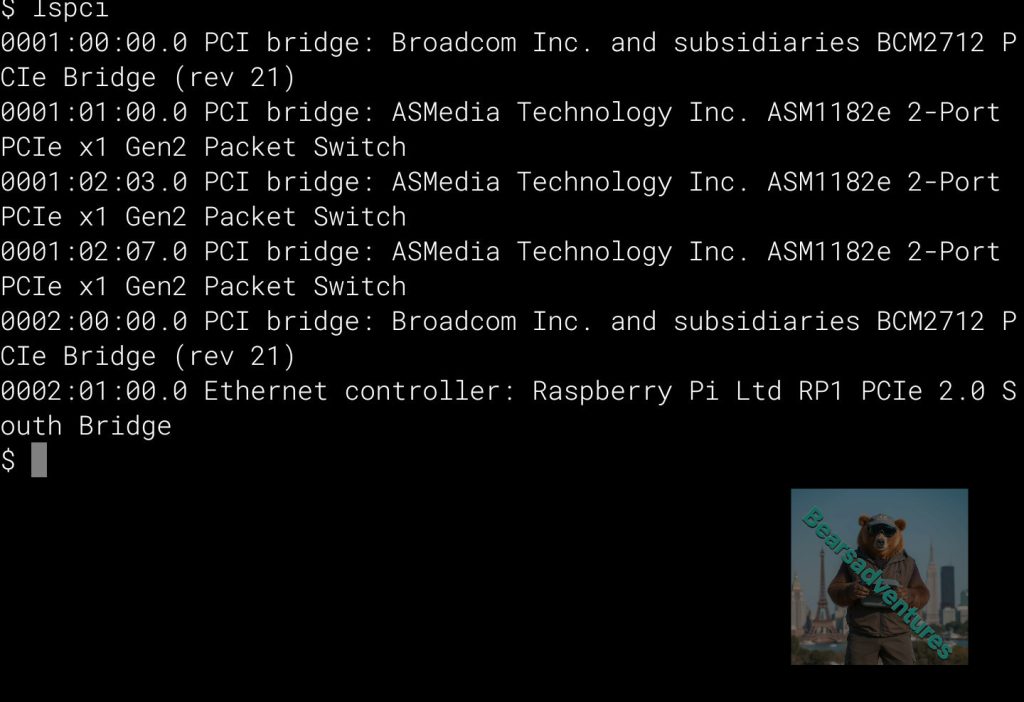
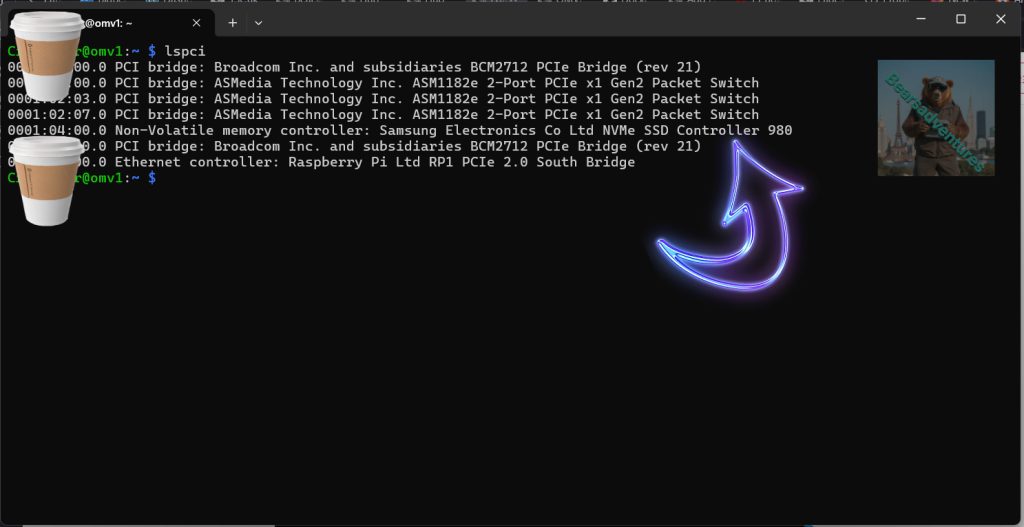
Run this commend to check LSPCI
Checking the PCIE is Detected
left hand side its not detected
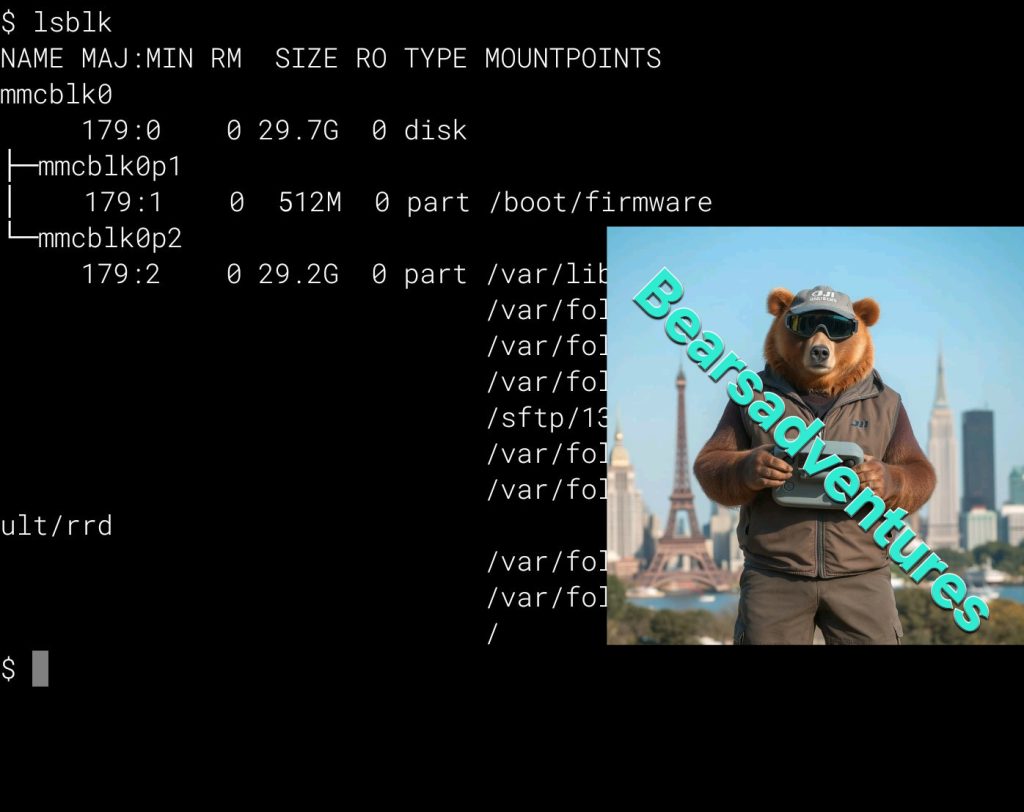
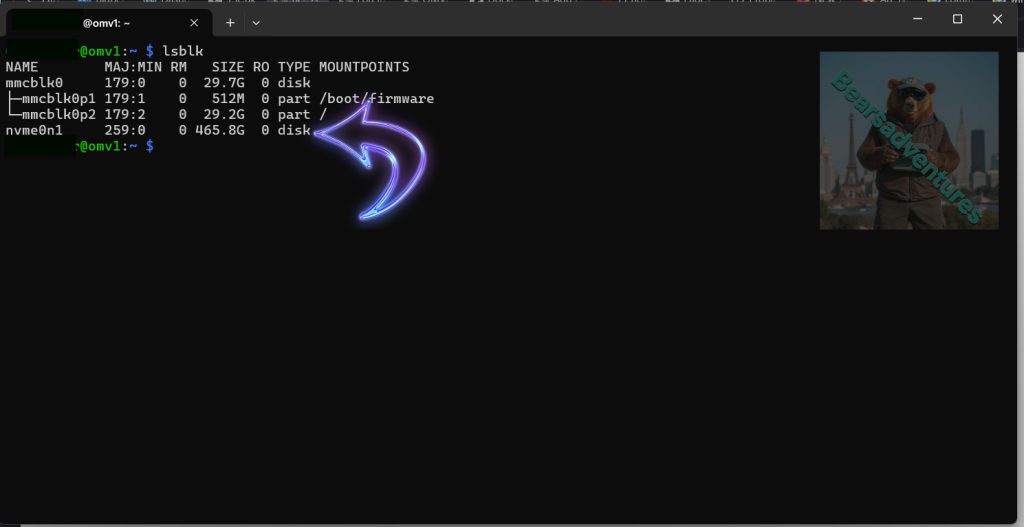
Run this commend LSBLK
Checking the SSD`s are Detected
left hand side its not detected
My thoughts upto now
Up to now i have not managed to get this NMVE duo board working. My first attempt when i got the board i Re-seated the ribbon cable 4 times and did a number of fresh OS installs thinking if could be anything.
2 days later a second Ribbon in still nothing from the board. i have got power going to the board as the SSD Power button is on. my next job is to check the SSD. i Have a SSD to USB adaptor on the way. so i will be able to check the SSD. Also i have managed to pickup another SSD, This one is Western Digital. I have WD SSDs in My synology system and touch wood up to now no issues after 5yrs,
Not sure what day this is now on this Project but while i am waiting for parts i have been creating a few dockers on Openmediavault on the PI5 and playing around with the system seeing how i navigate openmediavault. over all good little system
Here are some links of what i have been doing with my Pi5 System.
OMV Docker OMV Drive mount OMV folder share OMV Users Wireguard OMV Fail3ban Homeassistant OMV Dark Mode OMV Notifications OMVdockerWordpress OMVDuckDNS OMVCLoudflare OMVWatchyourlan sftp
SSD to USB has Arrived along with a new SSD
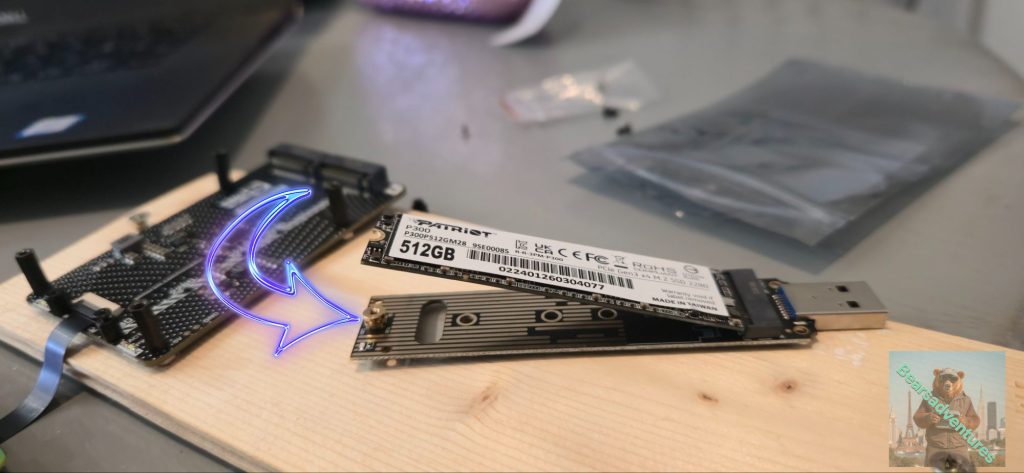
Now its time to get to work and find out what the problem is. first up is the original SSD i purcsased. I inserted the SSD into the USB adaptor. There is a spacer to install on the adaptor before i insert the SSD
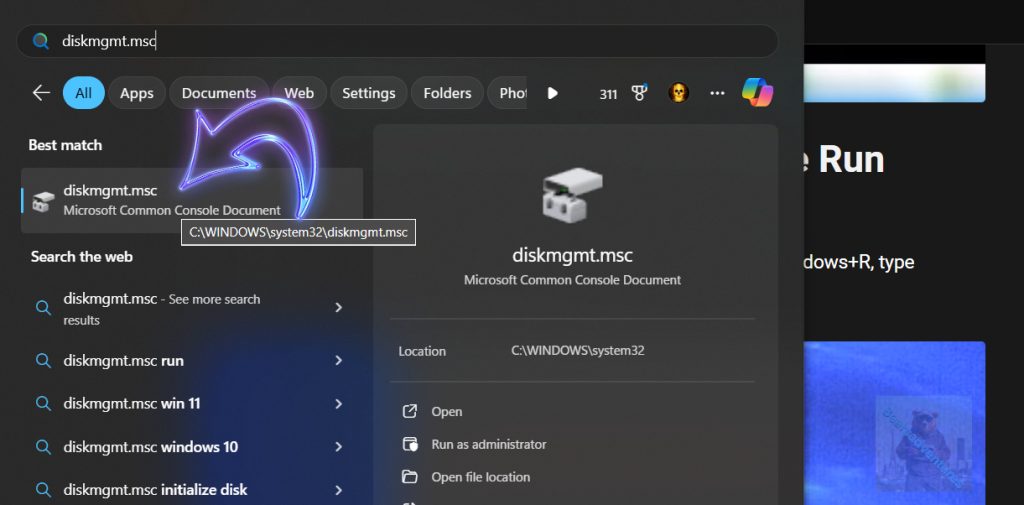
Now load up your pc / laptop, In my case i have a windows 11 laptop and type in the search bar diskmgmnt.msc, then select disk management software.
Now the disk management is loaded. plugin the USB adaptor. I did notice a nice blue light turn on the USB adaptor, Finally something working.
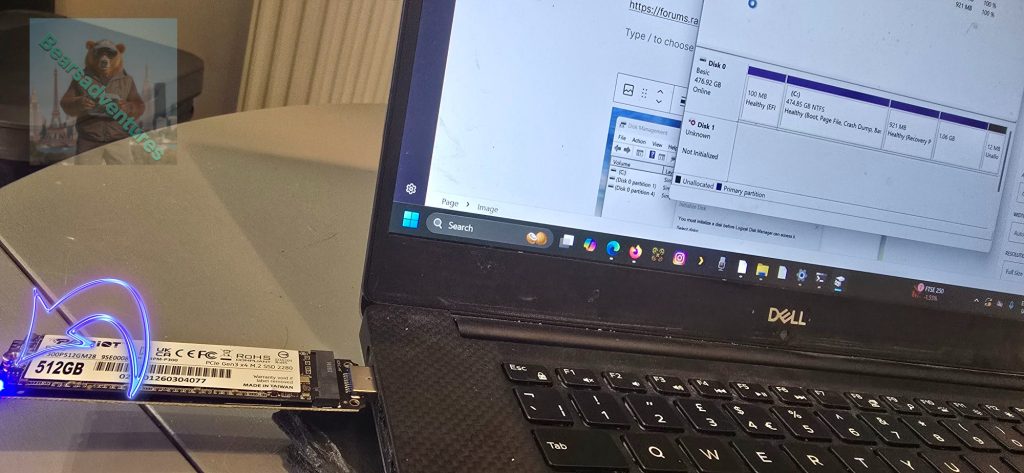
The SSD is showing as not initialized \ Unknown. Not a Good sign. I also tried to create a Partition but nothing.
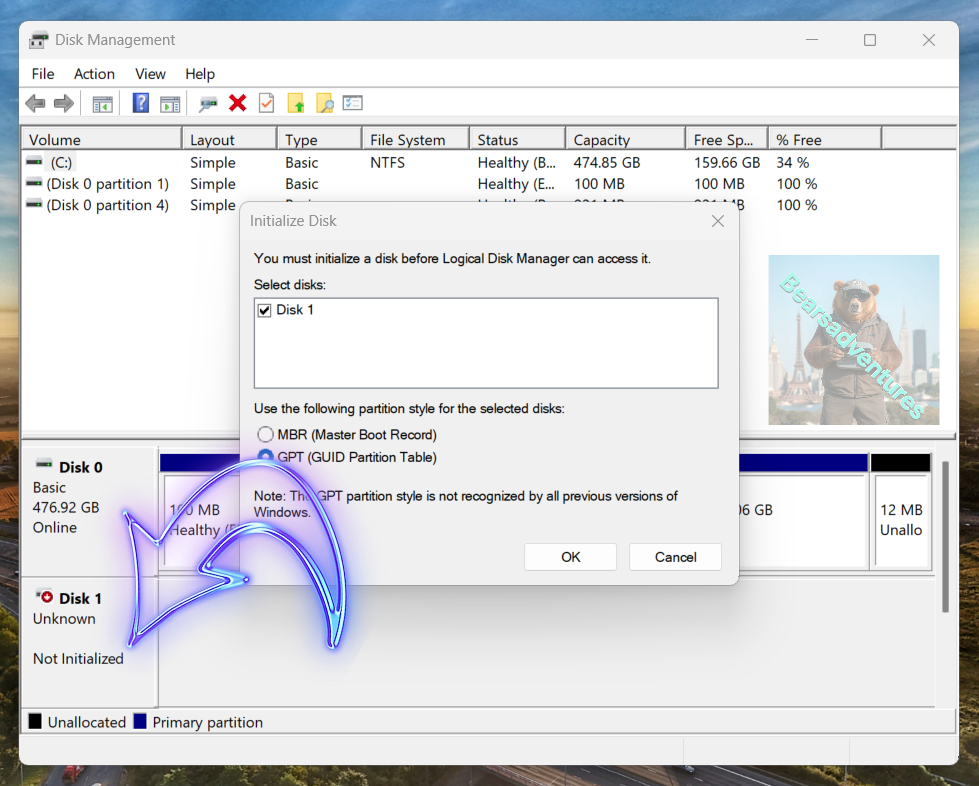
I got this error message when i tried to create the partition. So i guess this SSD is DEAD. I did contact the seller of the drive and agreed a return.

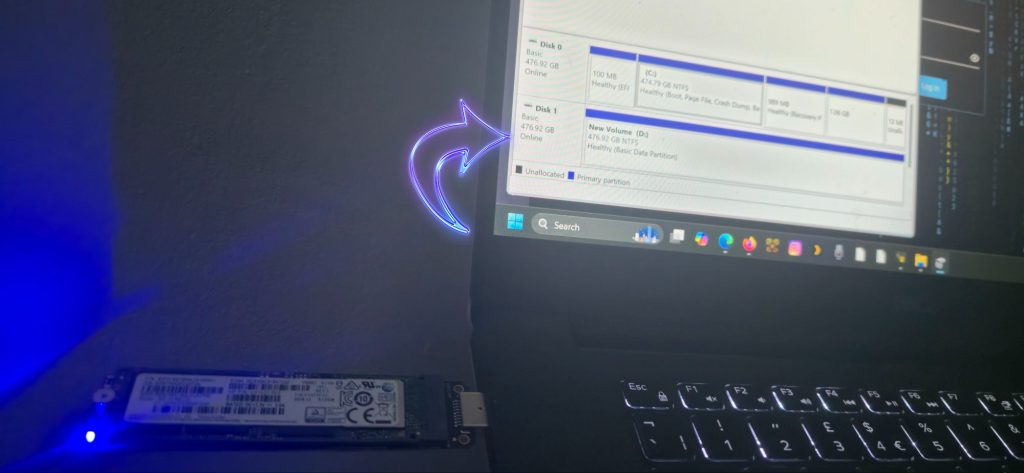
Next stage is to try the new SSD, same process again. Install the SSD into the SSD to USB. This time it works as you can see i get unallocated space on the SSD
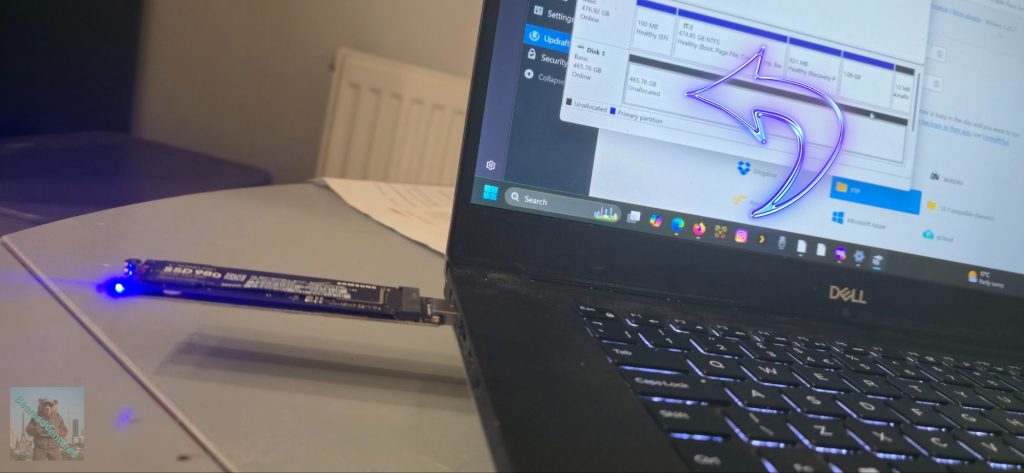
So now i know the SSD works and has been initialized. Time to install it into the NVME due board.

So now i have the SSD installed and the project back together im going to see if the Controller and SSD is Detected.
So after trying lspci i get the SSD show up in the list.
And trying lsblk, I see the drive is now visible ready for use. Finally some success with this project.
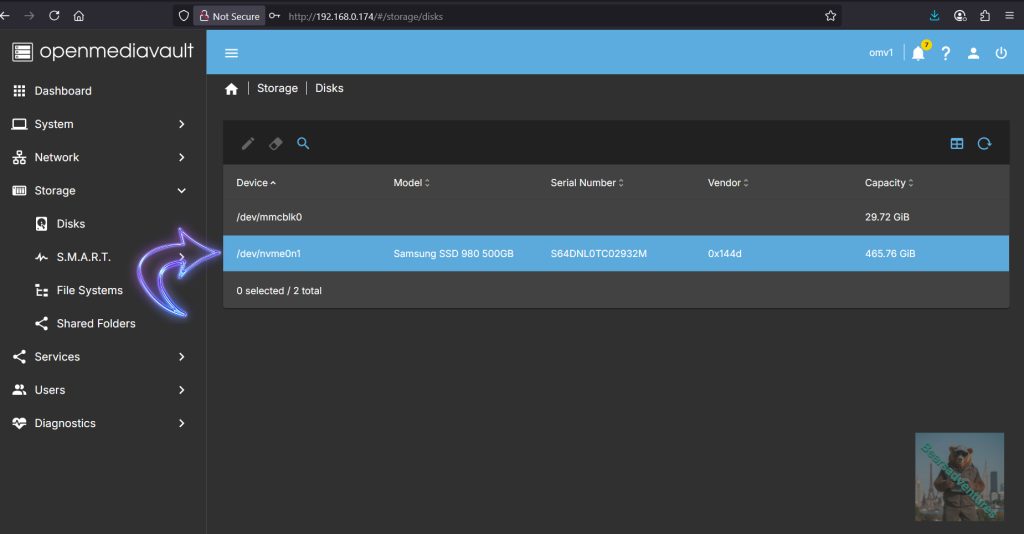
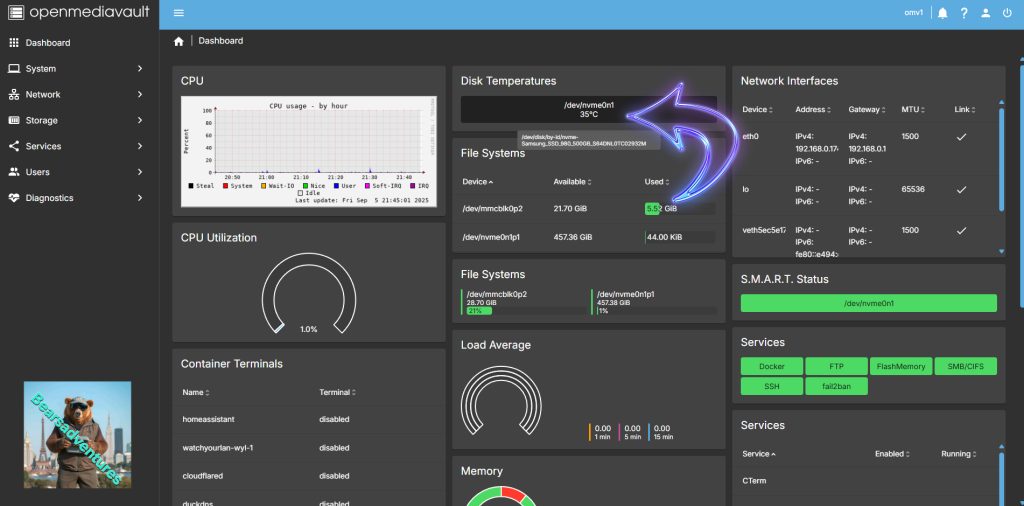
I Load up Openmediavault and pray the drive shows up in the disk section.
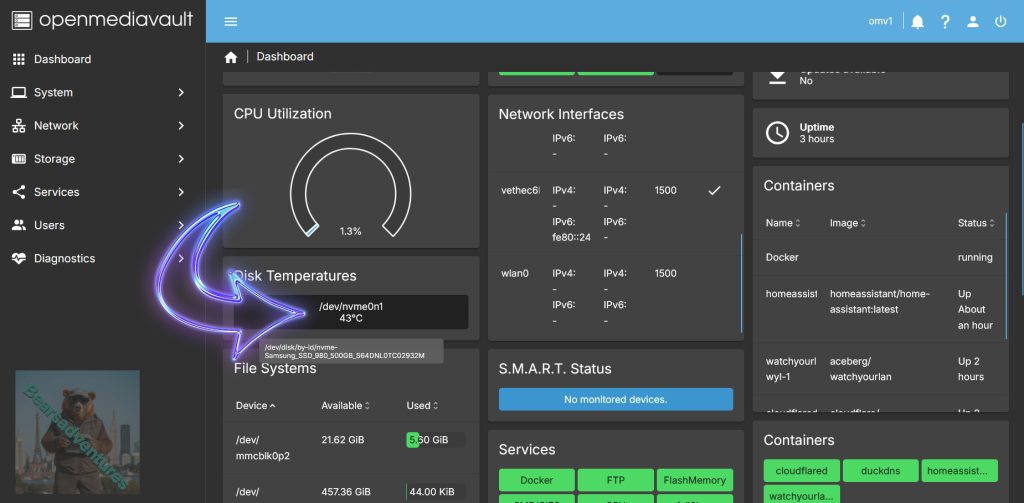
The SSD is running hot and i have not done anything with it yet, 43c so i need to have a look at what i can change
Last year i purchased some spacers for another project. I am glad i saved those now. link here.
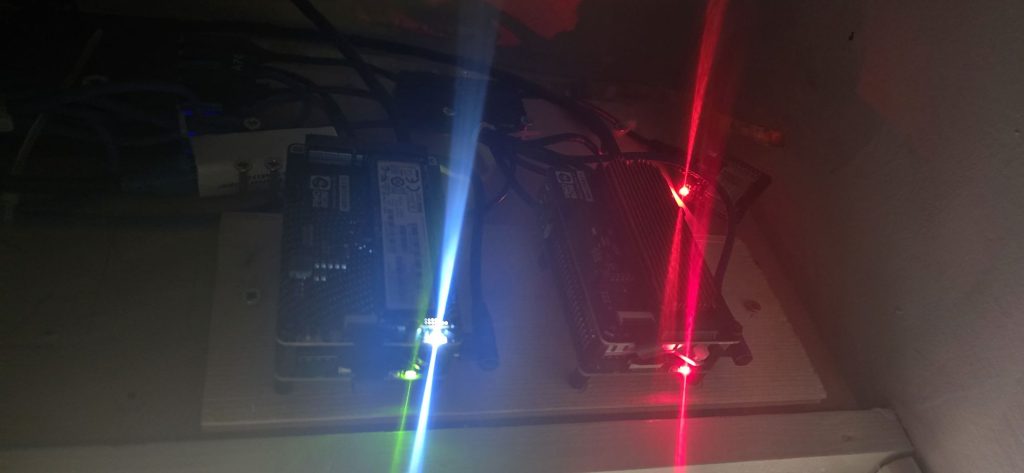
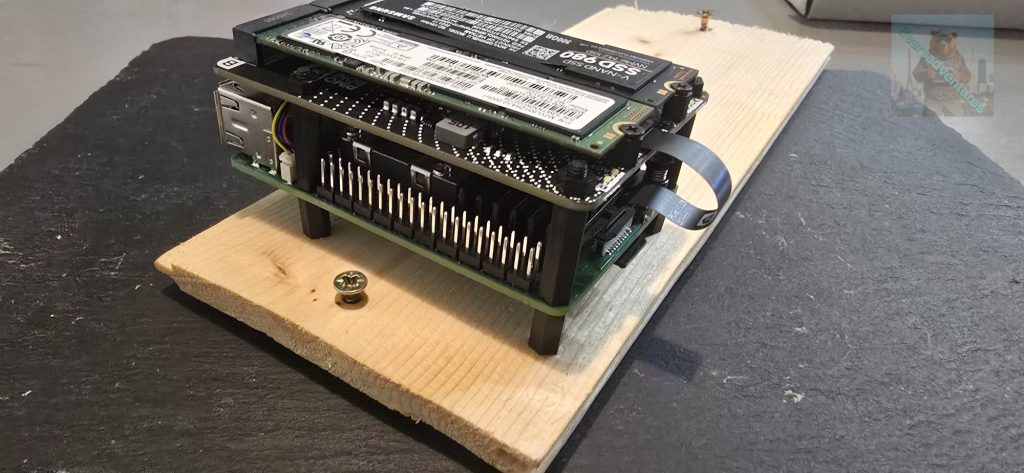
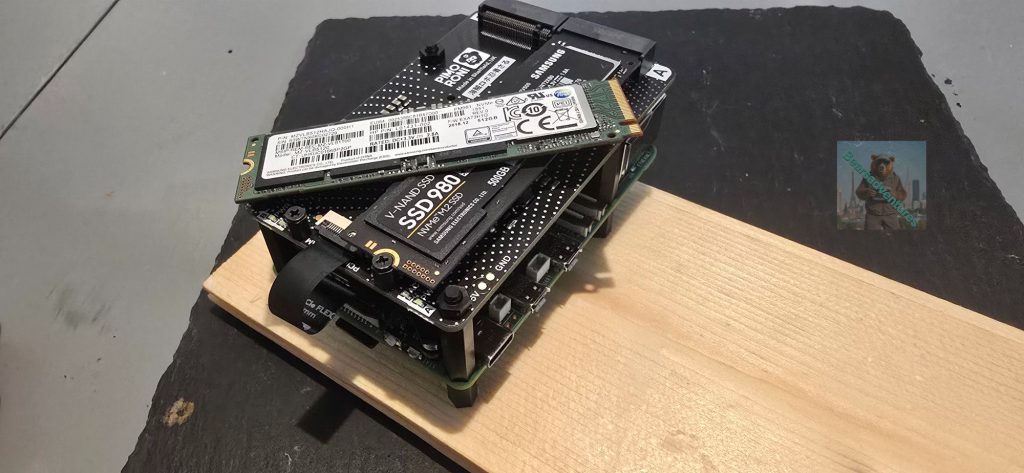
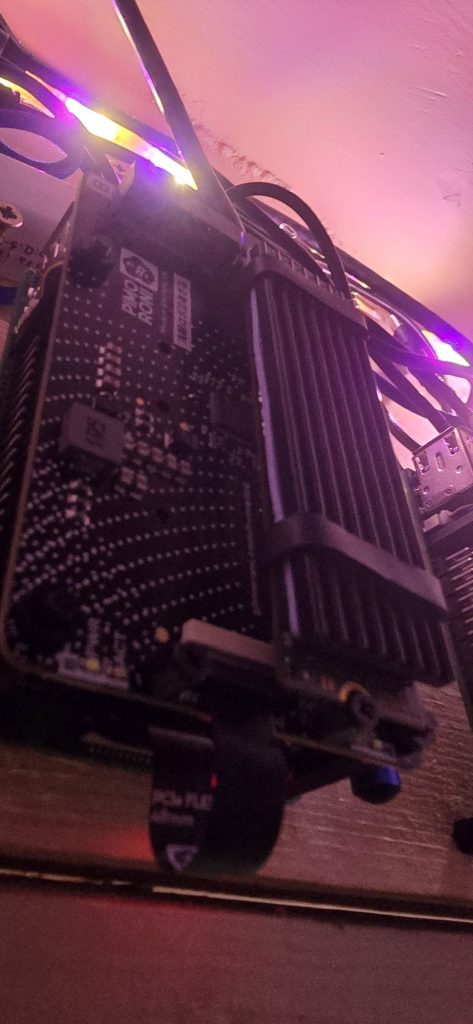
Because the SSD is getting so hot, I have decided to move the Duo Board to the top for better Ventilation to the SSD. I think the project looks better now the boards are more spaced apart.
Now the system hase been running a few hours, The SSD is at 35c. I have ordered a SSD Heatsink to help even more
My thoughts upto now
I am really happy how this has turned out now, I have another SSD on order and a Heat Sink. my Next step is to install the Heat sink and see how the drive performs heat wise. Then i am going to install the other SSD and move the OS over from the SD card to the SSDs. The SSDs are going to be raid 1
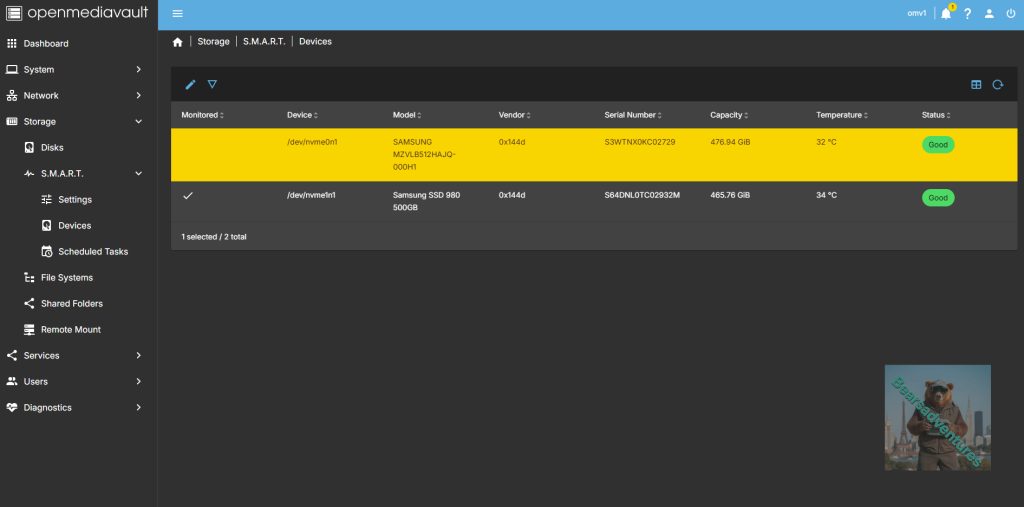
Second SSD has arrived, I have checked it first, before installing it and all is in good order. so installed onto my project (Samsung PM981 512GB SSD NVMe 2280)
The SSDs are both showing in Openmediavault.
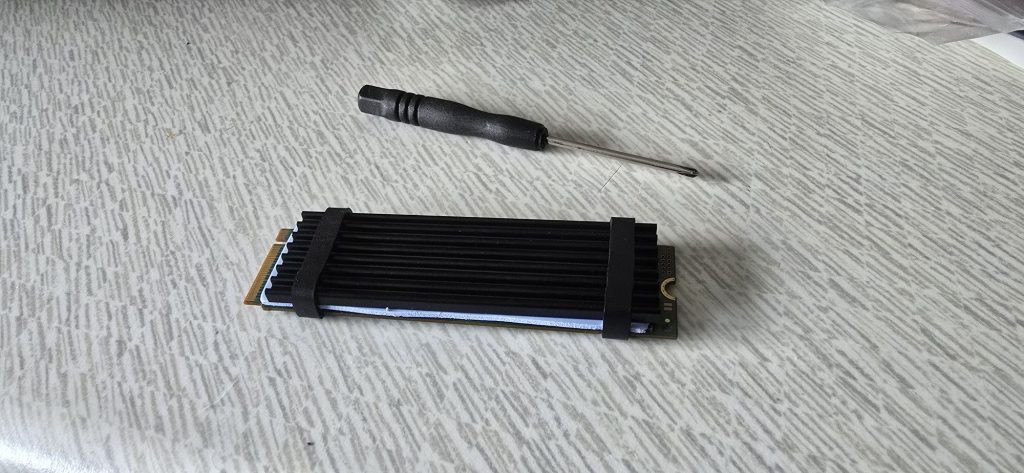
I ordered a Heat sink to see if i get much out of it in the way of lower temperatures for the NVME drives
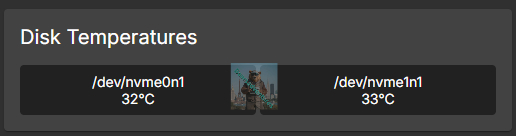
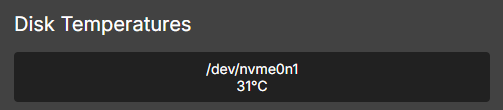
I have had this Heat Sink on the drive for about 18hrs now with the temperatures dropping a little bit 2ish degrees, 32c is not bad to say i started out with 43c and all i have done is swapped around the boards, bigger standoffs with a heat sink. i only have 1 heat sink to really see if its worth the hassle to get another one.
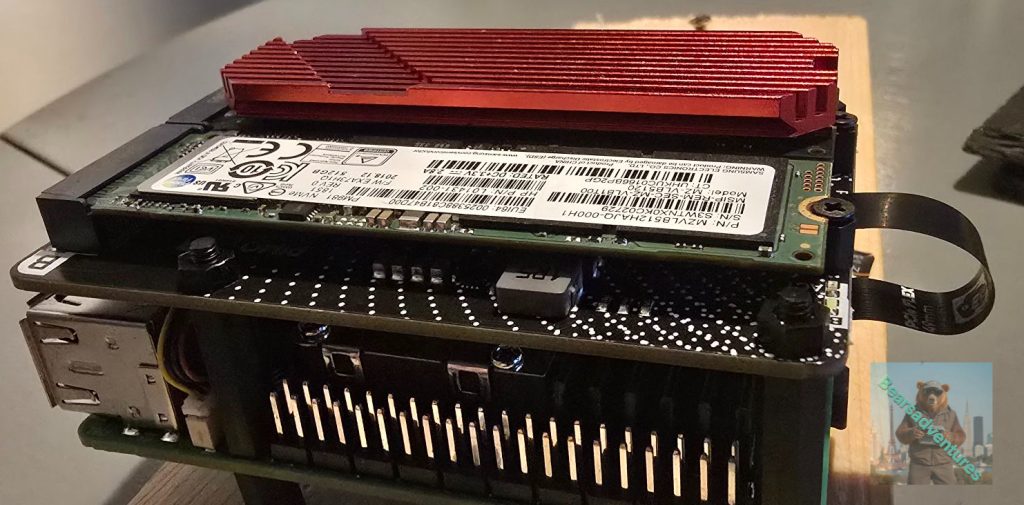
NVME0n1 is the one with the heat sink on, i think it is helping the other one aswell a little bit.
I have changed over the heatsink now. To another brand. So i can put a heatsink on both the NVME drives. I put the red one on my other project. Here
I have installed OMV directly onto the NVME and works perfectly. Follow these steps to boot from a SSD. Put this line of code into your terminal. remember to flash your SSD with a fresh image of PI, This is the Same way as if you was flashing a SD-card.
sudo raspi-config
The option to boot from SSD can be found under Advanced Options > Boot Order > NVMe/USB Boot.
remember to remove your SD card when complete and your pi is off.
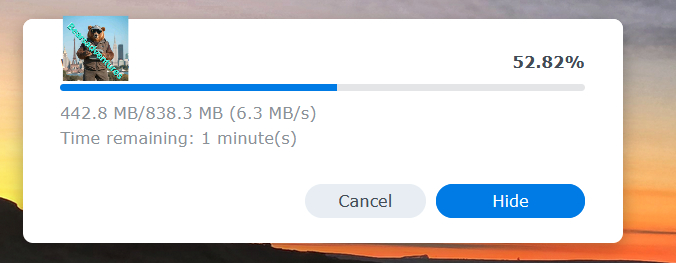
SD-Card copy speed. Im going to update this after i have done a few more tests copying to SSD`s.
Final Thoughts
So abit of a learning curve for myself is to check the SSDs before i do anything with the drive. It has been a lot of fun playing around with OMV. I will be posting more when i have the Heatsink for the SDD. I would defiantly recommend a longer ribbon for the SSD duo board, the over all system is great. copying to the SSD has no issues surprisingly fast.
Future of the project and why i have done this project. I currently have a synology 5 bay server as my Work horse. But what happens if that was to stop working for whatever reason.
This project is to learn Openmediavault and what it has to offer. I am very impressed with Raspberry pie 5, So powerful for such a little board. I have had a website running on the pie and love how docker runs as a whole within the system of OMV. I am going to continue with playing with this system as i think there is alot of potential for the future with it. My plan is to migrate the OS over to SSD and Raid the 2 SSD together, when i get the second SSD. Im hoping the performance will be even better, I will add to this page with my findings..
Trouble shooting
By default, Raspberry Pi devices do not boot from PCIe storage. To enable boot from PCIe, change the BOOT_ORDER in the bootloader configuration. Edit the EEPROM configuration with the following command:
sudo nano boot/firmware/config.txt:
put this in
dtparam=pciex1
Reboot with
sudo reboot- Boot from PCIe
By default, Raspberry Pi devices do not boot from PCIe storage. To enable boot from PCIe, change the BOOT_ORDER in the bootloader configuration. Edit the EEPROM configuration with the following command:
sudo rpi-eeprom-config --editReplace the BOOT_ORDER line with the following line
BOOT_ORDER=0xf416To boot from a non-HAT+ device, also add the following line:
PCIE_PROBE=1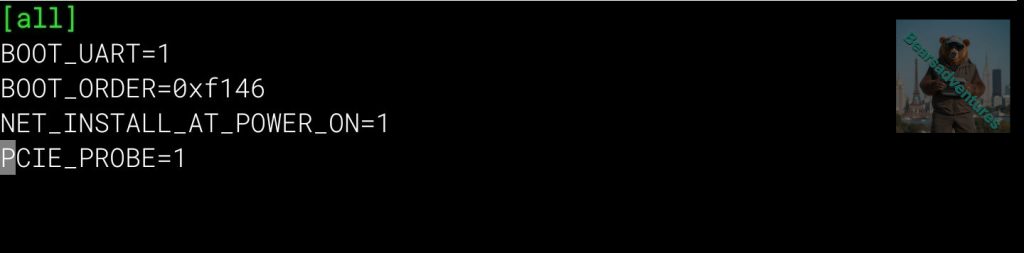
After saving your changes, reboot your Raspberry Pi with sudo reboot to update the EEPROM
- PCIe Gen 3.0
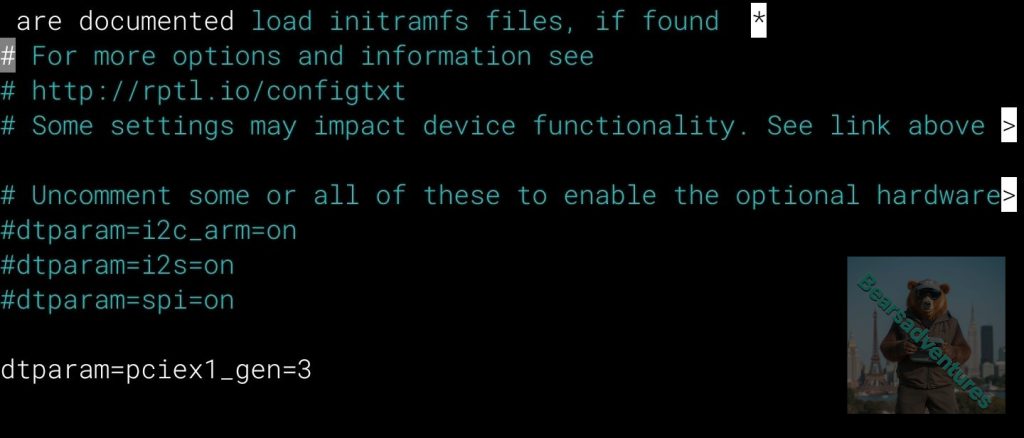
SSH into your pi 5 terminal and type the following. nano is a simple file editor perfect for this task.
Reson for this task is to enable PCIE Gen 3 Speeds
sudo nano /boot/firmware/config.txtInsert this into the file
dtparam=pciex1_gen=3now reboot for this to take effect
after reboot now do the following
sudo raspi-config 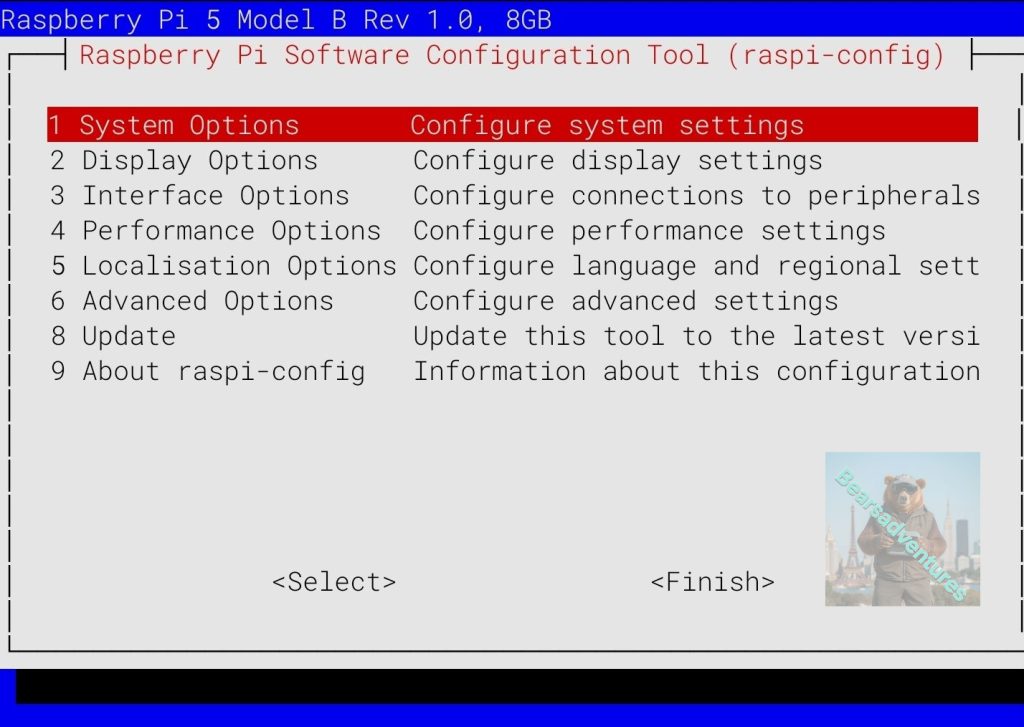
Complete the following steps to enable PCIe Gen 3.0 speeds:
Select Advanced Options.
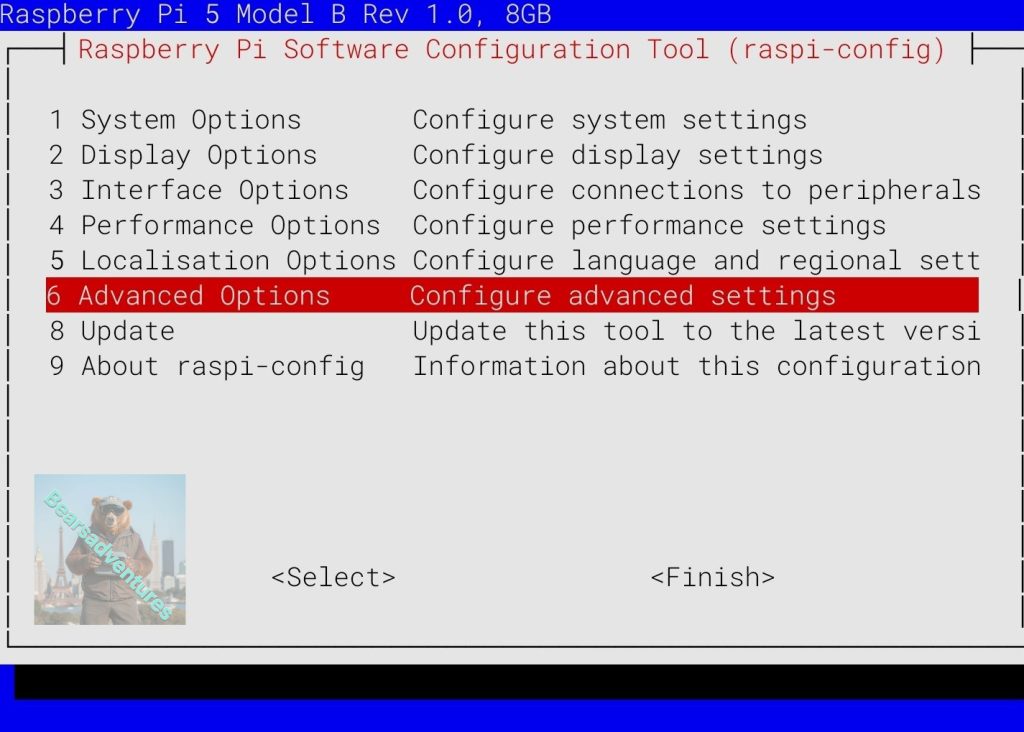
- Select
PCIe Speed.

- Choose
Yesto enable PCIe Gen 3 mode.
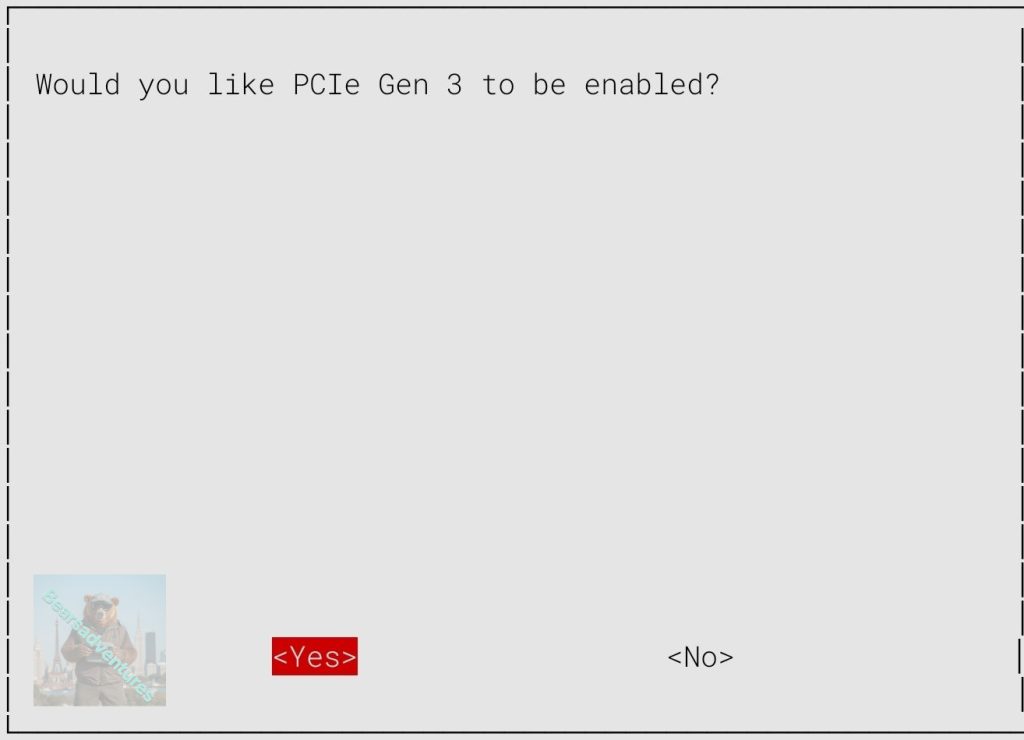
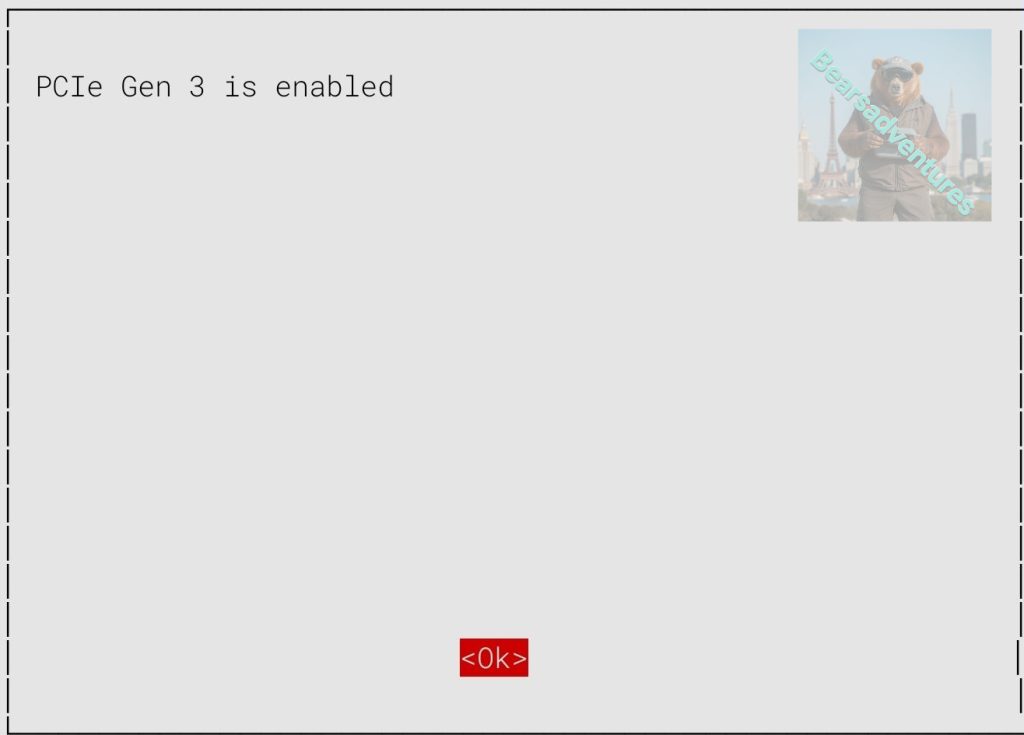
- Select
Finishto exit.
- Reboot your Raspberry Pi with
sudo rebootfor your changes to take effect.
For NVMe drives to play nicely with Pi 5 (and to be able to boot from SSD), your bootloader firmware should be dated newer than May 2024. The commands above should have updated it for you, but if you’d like to double check you can enter:
sudo rpi-eeprom-update

board Diagram
share : https://13ear.uk/3cit